Hadoop Multi-node Cluster on Amazon AWS EC2
Amazon Web Services provides on-demand computing resources and services in the cloud, with pay-as-you-go pricing. AWS offers free micro-instances for the period one year which we will use for practice.

You can stop the instance anytime to avoid the charge, but you will loose the public IP and host and restarting the instance will create new ones,. You can also terminate your Amazon EC2 instance anytime and by default it will delete your instance upon termination, so just be careful what you are doing.
Get Amazon AWS Account
Log into your AWS account under aws.amazon.com. Otherwise create a new account.

Launching Multiple AWS Micro-Instances
Once you have signed up for Amazon account. Login to Amazon Web Services, click on My Account and navigate to Amazon EC2 ("Elastic Cloud Compute").

Click on "Launch Instance".

Select Amazon Machine Image
Pick free tier eligible Ubuntu Server 14.04 LTS Server 64-bit OS

Choose an Instance Type
Amazon EC2 provides a wide selection of instance types optimized to fit different use cases. Instances are virtual servers that can run applications. They have varying combinations of CPU, memory, storage, and networking capacity, and give you the flexibility to choose the appropriate mix of resources for your applications. Learn more about instance types and how they can meet your computing needs.
Choose free tier option.

Configure Instance Details
Configure the instance to suit your requirements. You can launch multiple instances from the same AMI, request Spot instances to take advantage of the lower pricing, assign an access management role to the instance, and more.

Add Storage
Your instance will be launched with the following storage device settings. You can attach additional EBS volumes and instance store volumes to your instance, or edit the settings of the root volume. You can also attach additional EBS volumes after launching an instance, but not instance store volumes. Learn more about storage options in Amazon EC2.

Create Tag
Next we can give these instances a name so they are easily recognizable among other potential instances in your account. Here we gave all the instances the name 'master'. This can be modified as well after you have launched your instances.

Configure Security Group
The next step will be to configure the security groups HadoopEC2SecurityGroup setting for these instances. For this exercise, all the ports are open for ease of access. It should be noted that these settings should be much more strict if put in production. If a security group does not exist with the following configuration, you can create a new security group with the following settings.


Please note down the Instance ID, Public DNS/URL (ec2-54-200-148-117.us-west-2.compute.amazonaws.com) and Public IP for each instance for your reference.. We will need it later on to connect from Putty client. Also notice we are using “HadoopEC2SecurityGroup”.
Amazon Instances Client Access


Hope you have enjoyed the article.
Amazon Web Services provides on-demand computing resources and services in the cloud, with pay-as-you-go pricing. AWS offers free micro-instances for the period one year which we will use for practice.
You can stop the instance anytime to avoid the charge, but you will loose the public IP and host and restarting the instance will create new ones,. You can also terminate your Amazon EC2 instance anytime and by default it will delete your instance upon termination, so just be careful what you are doing.
Get Amazon AWS Account
Log into your AWS account under aws.amazon.com. Otherwise create a new account.

Launching Multiple AWS Micro-Instances
Once you have signed up for Amazon account. Login to Amazon Web Services, click on My Account and navigate to Amazon EC2 ("Elastic Cloud Compute").

Click on "Launch Instance".

Select Amazon Machine Image
Pick free tier eligible Ubuntu Server 14.04 LTS Server 64-bit OS

Amazon EC2 provides a wide selection of instance types optimized to fit different use cases. Instances are virtual servers that can run applications. They have varying combinations of CPU, memory, storage, and networking capacity, and give you the flexibility to choose the appropriate mix of resources for your applications. Learn more about instance types and how they can meet your computing needs.
Choose free tier option.

Configure Instance Details
Configure the instance to suit your requirements. You can launch multiple instances from the same AMI, request Spot instances to take advantage of the lower pricing, assign an access management role to the instance, and more.

Add Storage
Your instance will be launched with the following storage device settings. You can attach additional EBS volumes and instance store volumes to your instance, or edit the settings of the root volume. You can also attach additional EBS volumes after launching an instance, but not instance store volumes. Learn more about storage options in Amazon EC2.

Create Tag
Next we can give these instances a name so they are easily recognizable among other potential instances in your account. Here we gave all the instances the name 'master'. This can be modified as well after you have launched your instances.

Configure Security Group
The next step will be to configure the security groups HadoopEC2SecurityGroup setting for these instances. For this exercise, all the ports are open for ease of access. It should be noted that these settings should be much more strict if put in production. If a security group does not exist with the following configuration, you can create a new security group with the following settings.

Launch Instance and Create Security Pair
Click on Review and Launch Instance.
Amazon EC2 uses public–key cryptography to encrypt and decrypt login information. Public–key cryptography uses a public key to encrypt a piece of data, such as a password, then the recipient uses the private key to decrypt the data. The public and private keys are known as a key pair.
Create a new keypair and give it a name “hadoopec2clusterKey” and download the keypair (.pem) file to your local machine. Click Launch Instance

Launching Instances
Once you click “Launch Instance” 3 instance should be launched with “pending” state

Once in “running” state we are now going to rename the instance name as below.
Action >> Instance setting >> Add/Edit Tag
- HadoopNameNode (Master)
- HadoopSlave1 (data node will reside here)
- HaddopSlave2 (data node will reside here)

Finally Screen looks like

Please note down the Instance ID, Public DNS/URL (ec2-54-200-148-117.us-west-2.compute.amazonaws.com) and Public IP for each instance for your reference.. We will need it later on to connect from Putty client. Also notice we are using “HadoopEC2SecurityGroup”.
Amazon Instances Client Access
Use downloaded hadoopec2clusterKey.pem file to generate the private key (.ppk). In order to generate the private key we need Puttygen client. You can download the putty and puttygen and various utilities in zip from here.
Generating Private Key
Let’s launch PUTTYGEN client and import the key pair we created during launch instance step – “hadoopec2clusterKey.pem”
Navigate to Conversions and “Import Key”


Once you import the key You can enter passphrase to protect your private key or leave the passphrase fields blank to use the private key without any passphrase. Passphrase protects the private key from any unauthorized access to servers using your machine and your private key.
Any access to server using passphrase protected private key will require the user to enter the passphrase to enable the private key enabled access to AWS EC2 server.
Save Private Key
Now save the private key by clicking on “Save Private Key” and click “Yes” as we are going to leave passphrase empty.
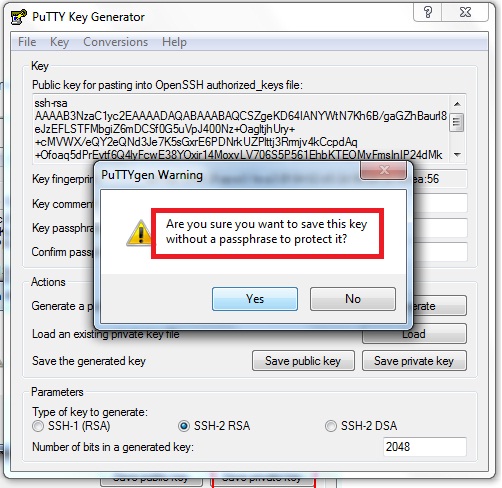
Save the .ppk file and give it a hadoopec2cluster name

Connect to our Amazon Instance Machine.
Connect to Amazon Instance
Let’s connect to HadoopNameNode. Use Putty client, grab the public URL , import the .ppk private key that we just created for password-less SSH access. As per amazon documentation, for Ubuntu machines username is “ubuntu”
Use private key for authentication

Provide Hostname and Port and Connection Type

“Open” to launch putty session. When you launch the session first time, you will see below message, click “Yes”. Then it will prompt you for the username, enter ubuntu, if everything goes well you will be presented welcome message with Unix shell at the end.

Similarly you can connect with HaddopSlave1, HadoopSlave2 to make sure you are able to connect successfully.
Update Host Name For Public Access
To configure master and slaves nodes with hostname instead of IP address. we need to update host name with EC2 public URL and finally we are going to update /etc/hosts file to map the EC2 public URL with IP address. Issue ifconfig command and note down the ip address.

Then issue the hostname command, it will display the ip address same as inet address from ifconfig command.

Update hostname to EC2 public URL using below command
$ sudo hostname ec2-54-200-148-117.us-west-2.compute.amazonaws.com

Update /etc/hosts
Change the hostname to EC2 public URL and IP Address

Repeat above action items for remaining 2 slave machines.
WinSCP access to EC2 instances
Provide hostname, username and private key file and save your configuration and Login

Click Login then popup will come click on Yes.If you see above error, just ignore and you upon successful login you will see unix file system of a logged in user /home/ubuntu your Amazon EC2 Ubuntu machine.

Transfer the hadoopec2clusterKey.pem file to master machine (HadoopNameNode). It will be used while connecting to slave nodes during hadoop cluster setup.
Setting up Hadoop multi-node cluster on Amazon EC2
Update the packages and dependencies by executing below commands
$ sudo apt-get update
Execute the same command on HadoopSlave1 & HadoopSlave2.
Then install java onto all AMI.
Install Java
Execute below command from all machine shell
$ sudo apt-get install openjdk-7-jdk
Check whether Java installed correctly with the following command
$ java -version
Download Hadoop
Next we'll install Hadoop-2.7.1 onto all the nodes by first saving the binary tar files to
~/Downloads and extracting it to the /usr/local folder. Repeat the same action onto all nodes.
$ wget http://apache.mirrors.tds.net/hadoop/common/hadoop-2.7.1/hadoop-2.7.1.tar.gz -P ~/Downloads
$ sudo tar zxvf ~/Downloads/hadoop-* -C /usr/local
$ sudo mv /usr/local/hadoop-* /usr/local/hadoop
Environment VariablesNow we'll need to add some Hadoop and Java environment variables to
~/.bashrc and source them to the current shell session for all Amazon Machine Instance(Repeat the same for all machine.)
Navigate to home directory
$ sudo vi ~/.bashrc
Add below Environment Variable
export HADOOP_HOME=/usr/local/hadoop
export HADOOP_CONF_DIR=/usr/local/hadoop/etc/hadoop
export HADOOP_PREFIX=/usr/local/hadoop
#Set JAVA_HOME
export JAVA_HOME=/usr/lib/jvm/java-7-openjdk-amd64
# Add Hadoop bin/ directory to path
export PATH=$JAVA_HOME/bin:$PATH:$HADOOP_HOME/sbin:$HADOOP_HOME/bin
Save and Exit.
Then Source bashrc file by executing below command
$ source ~/.bashrc
Password-less SSH on Servers Configuration
For starting Slave node from Master server remotely. It requires password-less SSH configuration for accessing Slave Servers. Aamazon Web Services Ubuntu server comes with Pre-installed OpenSSh server.
Now we need to add the AWS EC2 Key Pair identity haddopec2clusterKey.pem to SSH profile. In order to do that we will need to use following ssh utilities. Run below commands from Master machine.
$ chmod 644 ~/.ssh/authorized_keys
$ sudo chmod 400 hadoopec2clusterKey.pem
To use
ssh-agent and ssh-add, follow the steps below:- At the Unix prompt, enter: eval `ssh-agent` Note: Make sure you use the backquote (
`), located under the tilde (~), rather than the single quote ('). - Enter the command: ssh-add hadoopec2clusterKey.pem
if you notice .pem file has “read-only” permission now and this time it works for us.

Note : SSH session will be lost upon shell exit and you have repeat ssh-agent and ssh-add commands.
Remote SSH
Let’s verify that we can connect into HadoopSlave1 and HadoopSlave1 nodes from HadoopNameNode.
HadoopSlave1 :
$ ssh ec2-54-201-226-159.us-west-2.compute.amazonaws.com
On successful login the IP address on the shell will change.

Common Hadoop Configurations on all Nodes
Here are the following files to focus on:
$HADOOP_CONF_DIR/hadoop-env.sh
$HADOOP_CONF_DIR/core-site.xml
$HADOOP_CONF_DIR/yarn-site.xml
$HADOOP_CONF_DIR/mapred-site.xml
(This file currently does not exist in the default Hadoop installation, but a template is available. We'll make a copy of the template and rename it to
mapred-site.xml)1. Change in hadoop-env.sh onto all nodes$ sudo vim $HADOOP_CONF_DIR/hadoop-env.shAdd JAVA_HOME into the file and save itexport JAVA_HOME=/usr/lib/jvm/java-7-openjdk-amd642. $HADOOP_CONF_DIR/core-site.xml$ sudo vim $HADOOP_CONF_DIR/core-site.xmlAdd the NameNode's public DNS on port 9000, this will be same onto all nodes.
Here NameNode's public DNS is ec2-54-200-148-117.us-west-2.compute.amazonaws.com
<property>
<name>fs.defaultFS</name>
<value>ec2-54-200-148-117.us-west-2.compute.amazonaws.com:9000</value>
</property>
3. The next file to modify is the $HADOOP_CONF_DIR/yarn-site.xml$ sudo vim $HADOOP_CONF_DIR/yarn-site.xml
<property>
<name>yarn.nodemanager.aux-services</name>
<value>mapreduce_shuffle</value>
</property>
<property>
<name>yarn.nodemanager.aux-services.mapreduce.shuffle.class</name>
<value>org.apache.hadoop.mapred.ShuffleHandler</value>
</property>
<property>
<name>yarn.resourcemanager.hostname</name>
<value>ec2-54-200-148-117.us-west-2.compute.amazonaws.com</value>
</property>
4. The last configuration file to change is the
$HADOOP_CONF_DIR/mapred-site.xml. We will first need to make a copy of the template and rename it.
$ sudo cp $HADOOP_CONF_DIR/mapred-site.xml.template $HADOOP_CONF_DIR/mapred-site.xml
$ sudo vim $HADOOP_CONF_DIR/mapred-site.xml
<property>
<name>mapreduce.jobtracker.address</name>
<value>ec2-54-200-148-117.us-west-2.compute.amazonaws.com:54311</value>
</property>
<property>
<name>mapreduce.framework.name</name>
<value>yarn</value>
</property>
NameNode Specific Configurations
Now that all the common configurations are complete, we'll finish up the NameNode specific configurations. On the NameNode, all that remains are the following:
- adding hosts to
/etc/hosts - modifying the configurations in
$HADOOP_CONF_DIR/hdfs-site.xml - defining the Hadoop master in
$HADOOP_CONF_DIR/masters - defining the Hadoop slaves in
$HADOOP_CONF_DIR/slaves
Let's start with adding to the hosts file located under
/etc/hosts. We will need to add each node's public DNS and hostname to the list. The hostname can be found with the following.
$ sudo vim $HADOOP_CONF_DIR/hdfs-site.xml
<property>
<name>dfs.replication</name>
<value>3</value>
</property>
<property>
<name>dfs.namenode.name.dir</name>
<value>file:///usr/local/hadoop/hadoop_data/hdfs/namenode</value>
</property>
The current path where data on the NameNode will reside does not exist, so we'll need to make this before starting HDFS.
$ sudo mkdir -p $HADOOP_HOME/hadoop_data/hdfs/namenode
Next we'll need to add a masters file to the
$HADOOP_CONF_DIR directory
$ sudo cp $HADOOP_CONF_DIR/slaves $HADOOP_CONF_DIR/masters
Then Edit masters file and add hostname of NameNode.
$ sudo vim $HADOOP_CONF_DIR/masters
Add and save NameNode Machine hostname.
ec2-54-200-148-117.us-west-2.compute.amazonaws.com
Then Edit slaves file and add hostname of DataNode machines hostnames.
ec2-54-201-226-159.us-west-2.compute.amazonaws.com
ec2-54-200-226-44.us-west-2.compute.amazonaws.com
Now that all configurations are set on the NameNode, we will change the ownership of the
$HADOOP_HOME directory to the user ubuntu$ sudo chown -R ubuntu $HADOOP_HOME
DataNode Specific Configurations
Final configurations for the DataNodes. We will need to first SSH into each DataNode and only configure the
$HADOOP_CONF_DIR/hdfs-site.xml file
$ sudo vim $HADOOP_CONF_DIR/hdfs-site.xml
<property>
<name>dfs.replication</name>
<value>3</value>
</property>
<property>
<name>dfs.datanode.name.dir</name>
<value>file:///usr/local/hadoop/hadoop_data/hdfs/namenode</value>
</property>
Just like on the NameNode, we will need to create the directory specified in the
$HADOOP_CONF_DIR/hdfs-site.xml file.
$ sudo mkdir -p $HADOOP_HOME/hadoop_data/hdfs/datanode
Now that all configurations are set on the DataNode, we will change the ownership of the
$HADOOP_HOME directory to the ubuntu user
$ sudo chown -R ubuntu $HADOOP_HOME
Start Hadoop ClusterWe can now start up HDFS from the Namenode by first formatting it and then starting HDFS. An important thing to notes is that every time the NameNode is formatted, all of the data previously on it is lost.
Note: Be ensure remote SSH is working fine otherwise execute below command and the format the namenode.
1. At the Unix prompt, enter: eval `ssh-agent` Note: Make sure you use the backquote (
` ), located under the tilde ( ~ ), rather than the single quote ( ' ).
2. Enter the command: ssh-add hadoopec2clusterKey.pem
$ hdfs namenode -format
$ start-dfs.sh
Now let's start up YARN as well as the MapReduce JobHistory Server.
$ start-yarn.sh
$ mr-jobhistory-daemon.sh start historyserver
Output Will start datanodes as well. Because we are starting from master machine.
NameNode (Masters):
DataNode (Slave1):
DataNode (Slave2):
Hope you have enjoyed the article.
Author: Iqubal Mustafa Kaki, Technical Specialist.
Want to connect with me
If you want to connect with me, please connect through my email - iqubal.kaki@gmail.com
If you want to connect with me, please connect through my email - iqubal.kaki@gmail.com